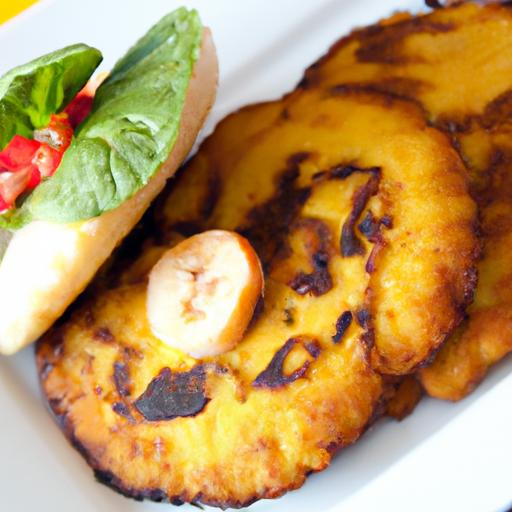
There’s something irresistibly magical about the humble arepa-a golden, crispy-edged corn cake that holds within it the rich culinary heritage of Latin America. From the bustling street corners of Caracas to cozy kitchens in Bogotá, these versatile delights have captured hearts and palates alike. But beyond their simple appearance lies a world of tradition, technique, and endless flavor possibilities. In “Mastering Arepas: A Delicious Guide to Authentic Recipes,” we embark on a flavorful journey to uncover the secrets behind perfecting this iconic dish. Whether you’re a curious foodie or a seasoned cook, prepare to dive into the art of crafting arepas that are crisp on the outside, tender on the inside, and bursting with authentic taste.
Mastering arepas begins with understanding the art of selecting the perfect cornmeal and crafting the dough that achieves the iconic texture and flavor. This customary Venezuelan and Colombian staple holds centuries of history, offering a warm, comforting canvas for endless fillings and variations. Whether you’ve encountered arepas as a casual street food or a cherished family recipe, unlocking their full potential means embracing the nuances behind every step-from grain to grill.
Prep and Cook Time
- Prep Time: 15 minutes
- Resting Time: 10 minutes
- Cook Time: 20 minutes
Yield
Makes 6 medium-sized arepas (serves 3-4)
Difficulty Level
Medium – Ideal for home cooks looking to deepen their culinary skills
Ingredients
- 2 cups pre-cooked cornmeal (harina precocida, such as P.A.N.)
- 2 ½ cups warm water
- 1 teaspoon fine salt
- 1 tablespoon vegetable oil (plus extra for cooking)
- Optional: ½ cup grated white cheese (for cheesy dough variation)
Instructions
- Combine Cornmeal and Salt: In a large mixing bowl, whisk together the pre-cooked cornmeal and salt to ensure even seasoning.
- Add Warm Water Gradually: Slowly pour in the warm water while stirring with your hand or a wooden spoon, encouraging the cornmeal to hydrate evenly without lumps.
- Incorporate Oil and Cheese: Mix in the vegetable oil and if using, the grated white cheese. The oil adds tenderness, while cheese enhances flavor and richness.
- Knead the Dough: Once the dough starts to come together, knead gently for about 3-5 minutes until smooth and pliable but not sticky. If too dry, add a tablespoon of water; if too wet, sprinkle a little cornmeal.
- rest the Dough: Cover the bowl with a clean kitchen towel and let the dough rest for 10 minutes. This step allows moisture to distribute fully and improves texture.
- Shape the Arepas: Divide the dough into six equal portions. Roll each into a ball and flatten into a disk approximately ¾ inch thick, ensuring even thickness for uniform cooking.
- Cook to crispy Perfection: Heat a skillet or griddle over medium heat and lightly grease with oil. Place the arepas on the surface and cook for about 6-7 minutes on each side, until golden brown and a crispy crust forms.
- Finish in oven (Optional): For an ideal fluffy interior, transfer the arepas to a preheated oven at 350°F (175°C) and bake for 10 minutes after skillet cooking.
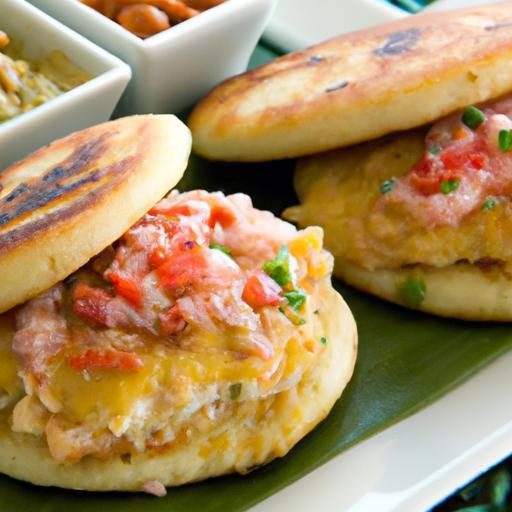
- Serve Warm: Slice open and stuff with your preferred fillings immediately while warm.
chef’s Notes: Tips for Success
- Choosing the Perfect Cornmeal: Use pre-cooked cornmeal (harina precocida), essential for authentic texture. avoid standard cornmeal or polenta, which won’t yield the right consistency.
- Dough Texture: The dough should feel soft, moist but not sticky. Adjust water and cornmeal ratios as altitudes and humidity vary.
- Resting the Dough: This step is vital-never skip it! It allows the cornmeal granules to absorb moisture, preventing cracks during cooking.
- Cooking Technique: Slow and steady wins the race. Low to medium heat prevents burning the outside while ensuring doneness inside.
- Flavor Boosters: for savory arepas, consider mixing scallions, cilantro, or smoked paprika into the dough. Sweet varieties can incorporate a bit of sugar or cinnamon.
- Storage and Make-Ahead: Cooked arepas can be cooled,then refrigerated or frozen. Reheat in a skillet or toaster oven to re-crisp before serving.
Serving Suggestions
Split your freshly cooked arepas and fill them with classic options like:
- Venezuelan Reina Pepiada: Creamy shredded chicken salad with avocado and mayo
- Colombian Queso y Hogao: Melted fresh cheese with tomato and onion sauce
- Avocado and black Beans: For a vegetarian, protein-rich option
Garnish with a sprinkle of crumbled queso fresco or a drizzle of spicy ají sauce for an extra punch. pair with a chilled tropical fruit drink or café con leche to complete your authentic experience.
| Nutrition per Arepa | Amount |
|---|---|
| Calories | 190 kcal |
| Protein | 4 g |
| Carbohydrates | 38 g |
| Fat | 3.5 g |

For more inspiration on Latin american treats, explore our Latin American corn-based recipes collection.
Q&A
Q&A: mastering Arepas – A Delicious Guide to Authentic Recipes
Q1: What exactly is an arepa?
A: Think of an arepa as a golden, corn-based canvas from Latin America-especially beloved in Venezuela and Colombia. It’s a round, flatbread made from ground maize dough that’s crispy on the outside and soft on the inside, ready to cradle an array of delicious fillings or be enjoyed on its own.
Q2: What makes arepas different from other corn breads or tortillas?
A: Unlike tortillas, which are typically thin and unleavened, arepas boast a thicker, fluffier texture with a slight crust. The magic lies in the precooked cornmeal called “masarepa,” which absorbs water to form a malleable dough that’s key to their signature bite. They’re truly a unique culinary experience-both humble and hearty.
Q3: How do I make authentic arepa dough at home?
A: The secret is simple: mix masarepa (precooked white or yellow cornmeal) with warm water and a pinch of salt until you get a smooth, pliable dough. Let it rest for a few minutes to hydrate fully, then form into discs about half an inch thick. No yeast, no baking powder-just pure corn magic.
Q4: What are some classic fillings for arepas?
A: The possibilities are endless, but classics include shredded beef (Carne Mechada), black beans and cheese, avocado with chicken salad, or the famed Reina Pepiada-a luscious mix of chicken, avocado, and mayo. Vegetarians can enjoy arepas stuffed with grilled veggies, cheese, or even with sweet fillings like ripe plantains.Q5: Cooking methods: Should I grill, bake, or fry my arepas?
A: All three techniques have their champions! Pan-frying yields a crispy crust with a soft, warm interior; baking ensures even cooking and a less oily finish; grilling gives a smoky, charred flavor. Many cooks start by frying or searing their arepas, then finish them in the oven to perfection.
Q6: Any tips to avoid dry or crumbly arepas?
A: Absolutely! The dough should be moist but not sticky-imagine the feel of soft modeling clay.Hydrate the cornmeal thoroughly and don’t rush shaping. Also, cook them slowly over medium heat to develop a golden crust without drying out the inside.A little patience goes a long way.
Q7: Can I make arepas gluten-free?
A: Yes! since masarepa is naturally gluten-free cornmeal,traditional arepas are a safe and satisfying option for gluten-sensitive eaters. Just double-check your fillings to keep things allergy-kind.Q8: How do I serve and enjoy arepas authentically?
A: Once cooked, split your arepa open just like a pita and stuff to your heart’s content. Serve them warm alongside fresh salsas, guacamole, or a drizzle of tangy crema.Whether for breakfast, lunch, or dinner, arepas invite conviviality-great food shared, bite by delicious bite.
–
Embrace the soulful simplicity of arepas,and you’ll soon find that mastering this humble cornbread opens a portal to vibrant flavors and rich traditions. Ready to roll up your sleeves and get shaping? The perfect arepa awaits!
Concluding Remarks
As the golden crust of your perfectly crafted arepa reveals its warm, tender heart, you’ve not only made a meal-you’ve embraced a vibrant tradition that spans cultures and generations. Mastering arepas is more than following a recipe; it’s about savoring the rich history and endless possibilities packed into each bite. Whether you prefer them stuffed, topped, or simply enjoyed plain, your newfound skills open the door to authentic flavors that welcome creativity and community alike. So keep experimenting, share your delicious creations, and let the humble arepa continue to inspire your culinary journey-one mouthwatering masterpiece at a time.